
COINQVEST is now Whalestack
You are looking at a blog post that was published when Whalestack was still known as COINQVEST. The content might be referencing our old name.
Blog Guide
Jun 2, 2020
How To Accept Bitcoin, Stellar Lumens and Other Cryptocurrencies with COINQVEST for WordPress
This guide walks you through installation and configuration of the official COINQVEST plugin for WordPress. Learn how to easily accept payments in Bitcoin, Ethereum, Stellar Lumens, or other cryptocurrencies on your WordPress site and automatically settle in your national currency. Sell your products and services in any of 50 supported worldwide currencies.
Last update: 2022/08/17
This guide walks you step-by-step through the installation of the COINQVEST WordPress plugin and explains how to configure payment buttons and translate the plugin.
The COINQVEST crypto payment gateway supports 50 billing currencies and easily lets you add a crypto payment option to your website or online shop to sell digital content, services, products and much more in your national currency.
If you are looking for the WooCommerce plugin, find it here.
Key Features of the COINQVEST WordPress Plugin
- Accepts Bitcoin (BTC), Ethereum (ETH), Ripple (XRP), Stellar Lumens (XLM) and Litecoin (LTC) payments from customers.
- Instantly settles in your preferred national currency (USD, EUR, ARS, BRL, NGN) or cryptocurrency (BTC, ETH, XLM, LTC, XRP).
- Sets the product price in your national currency – 45 fiat currencies and 5 crypto currencies are available, see full list here.
- Doesn't require any e-commerce setup on your WordPress site.
- Embeds a payment button in any page, post or widget of your WordPress site.
- Sets the product price in your national currency.
- Sets the checkout page in your preferred language.
- Eliminates chargebacks and gives you control over refunds.
- Eliminates currency volatility risks due to instant conversions and settlement.
- Controls tax compliance levels (none, minimal, compliant).
- Automatically generates invoices if tax compliance level is set to compliant.
- Provides custom payment button text.
- Provides custom payment button CSS classes available.
- Translates the plugin into any required language.
Supported Currencies
Argentine Peso (ARS), Australian Dollar (AUD), Bahraini Dinar (BHD), Bangladeshi Taka (BDT), Bermudian Dollar (BMD), Bitcoin (BTC), Brazilian Real (BRL), British Pound (GBP), Canadian Dollar (CAD), Chilean Peso (CLP), Chinese Yuan (CNY), Czech Koruna (CZK), Danish Krone (DKK), Emirati Dirham (AED), Ethereum (ETH), Euro (EUR), Hong Kong Dollar (HKD), Hungarian Forint (HUF), Indian Rupee (INR), Indonesian Rupiah (IDR), Israeli Shekel (ILS), Japanese Yen (JPY), Korean Won (KRW), Kuwaiti Dinar (KWD), Litecoin (LTC), Malaysian Ringgit (MYR), Mexican Peso (MXN), Myanmar Kyat (MMK), New Zealand Dollar (NZD), Nigerian Naira (NGN), Norwegian Krone (NOK), Pakistani Rupee (PKR), Philippine Peso (PHP), Polish Zloty (PLN), Ripple (XRP), Russian Ruble (RUB), Saudi Arabian Riyal (SAR), Singapore Dollar (SGD), South African Rand (ZAR), Sri Lankan Rupee (LKR), Stellar (XLM), Swedish Krona (SEK), Swiss Franc (CHF), Taiwan Dollar (TWD), Thai Baht (THB), Turkish Lira (TRY), Ukrainian Hryvnia (UAH), US Dollar (USD), Venezuelan Bolivar (VEF), Vietnamese Dong (VND)
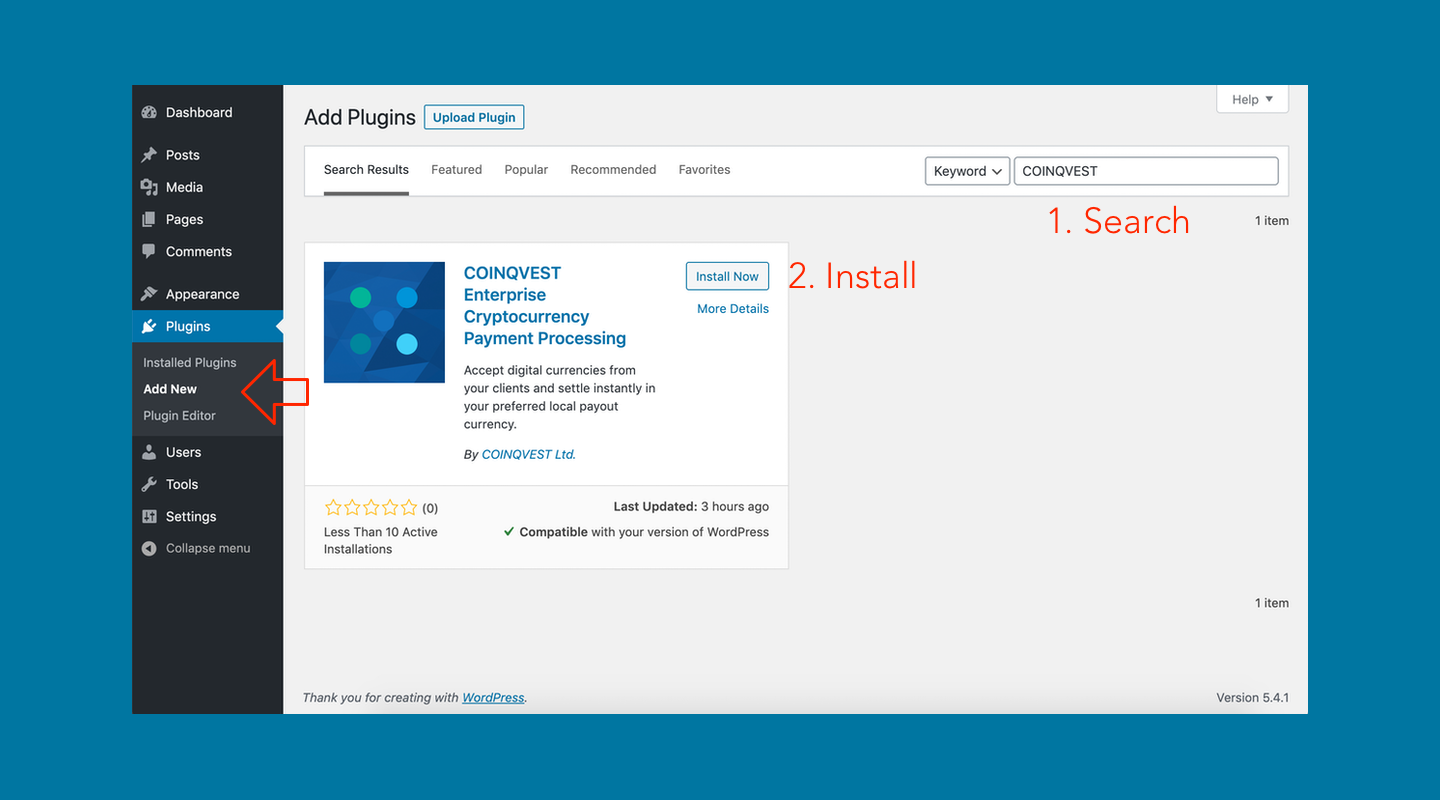
Step 1: Installation
Requirements
Plugin installation
Use the WordPress Plugin Search and enter “COINQVEST” into the "Search plugins” field. Once the COINQVEST plugin shows up, press the "Install now" button and the "Activate" button afterwards:
Alternatively, you can download the plugin from the WordPress Plugin Directory and install it manually by uploading it to your WordPress website.
Once installed, the COINQVEST plugin appears in the left hand side menu of your WordPress admin screen.
Plugin Configuration
- Get your API key and secret from your COINQVEST merchant account.
- Enter API key and secret into the COINQVEST WordPress plugin settings page.
Step 2: Adding a Payment Button to your WordPress Site
- Click on the “Add payment button” link in the COINQVEST plugin sidebar menu.
- Provide a name and a JSON object for the new payment button.
A JSON object is a way to store all the parameters of your payment button in an organized and human-readable manner.
- In the dark blue field of below's screenshot, you find the minimum parameters for the payment charge.
- The easiest way is to copy the JSON example in the blue field and paste it into the white JSON object text area field. Then adjust the parameters according to your requirements. Check the API documentation for all possible parameters.
- Upon saving, the plugin automatically validates the JSON object. Possible errors are displayed and you can find them on the logs page as well.
- Optionally, enter a custom button text and custom CSS style class for the button.
- Click “Save” and you are redirected to the payment buttons overview page where you find the generated
[shortcode]for that button. - Copy the
[shortcode]into any page or post on your WordPress website. Simply add a shortcode block in the post/page editor and paste the shortcode into it. For more details, please check out this guide. If you want to use the shortcode in a widget, make sure to use a "Text" widget. The "Custom HTML" widget, for example, does not render shortcode.
Step 3: The Settings Page
On the settings page you maintain your API credentials and a few global settings. Global settings are parameters that overwrite the respective JSON parameters in the payment charge object:
- Return URL: Specifies where to send the customer when the payment successfully completed.
- Cancel URL: Specifies where to send the customer when he wishes to cancel the checkout process.
- Webhook URL: A webhook URL on your server that listens for payment events.
- Settlement Currency: The currency you are credited in. If you don't choose a currency here, the settlement currency is be the billing currency.
With the "Required Customer Info" field, you define your tax compliance level and connect a payment to a customer.
- Minimal: User is required to enter first name, last name and email. A customer is generated in your COINQVEST merchant account and the payment is attached to it.
- Compliant: User is required to enter first name, last name, email and address data. A customer is generated in your COINQVEST merchant account and the payment is attached to it. This level also automatically generates a tax compliant invoice for each purchase.
The following screenshot shows how 'minimal' and 'compliant' options are displayed to the user:
The Logs Page
All requests and responses to the COINQVEST API are logged here. Use for debugging.
The Merchant Account on COINQVEST
Manage all payments and customers in your merchant account. You are notified by email about every new payment.
Translation
We recommend using the Poedit software for translation-related purposes. To translate the plugin to your language, please follow these steps:
- Download and install Poedit software.
- Navigate to the
plugins/coinqvest/languages/folder and copy the .pot file to your desktop for editing. - Open the .pot file and create a new translation for your language
- Translate all text strings
- Save your translations as a .po file. Make sure to follow the correct naming convention which is e.g. for German language
coinqvest-de_DE.po - Saving automatically generates a
coinqvest-de_DE.mo file - Copy the .po and .mo files into the
plugins/coinqvest/languages/folder
The field "Custom Button Text" of the payment button can be translated as follows:
- If you leave it blank the default “Buy Now” is used and translated into any language you have a .po file for. This is a good option for multilingual WordPress sites as you can make sure that your button text matches the respective languages.
- If you enter a custom button text it only displays in the language you enter the text. This is a good option for single language sites.
We Love to Help!
If you have questions, feedback or improvement suggestions, please feel free to contact us directly anytime.